
Post by cindi on Nov 8, 2010 15:14:09 GMT -5

1 tube of your choosing, I am using Grounded by Scott Blair you can find his work at MPT for a license.
My template which you can find at Elegant Inspirations download on the side template #26 elegantinspirations.blogspot.com/
Scrapkit I used was Acid Rock by Wicked Princess. It's a great kit! Go check it out. www.twilightscraps.com/index.php?main_page=product_info&cPath=1_114&products_id=4707&zenid=7cd8f2f4a32f4fe4ec477b51c1f16b0f
Animation shop
Psp any version should do
Ready?
Open your template and shift-d to duplicate it. Close the original and delete the copyright and background layer.
Go to your circle layer and select all, float and defloat.
Open your paper 1 and copy and paste as a new layer. Invert your selction and on your paper layer hit the delete button. Deselect and delete the template layer circle.
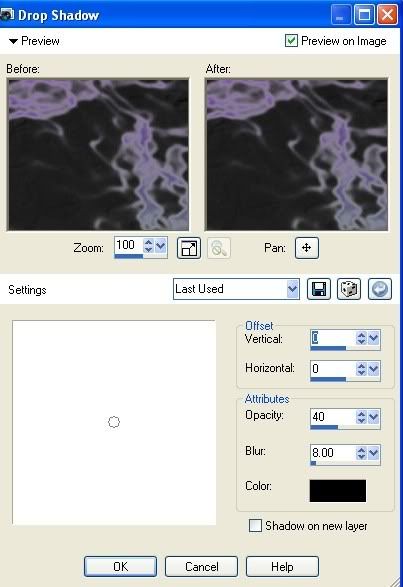
Add a drop shadow of your choosing or you can add mine to the circle layer.
Open paper three and copy it. Go to the bottom rectangle layer and select all, float and defloat. Paste your paper as a new layer. Invert the selection and hit delete. Deselect. Now as before delete that rectangle layer on your template. Add a drop shadow to this new layer you just created.
Go to strip 1 and select all, float and defloat as before.
Find paper 13 copy and paste it as a new layer. Invert your selection and hit delete. Deselect and delete the original template layer. Add your drop shadow.
Go to strip 2 and repeat this same process with paper 14.
Go to shape and select all float, defloat and copy and paste paper 11 into the selection. Don't worry if it's a little smashed in there but if you don't like that look then you can resize the paper a little. Deselect and add drop shadow.
Go to circle 2 and sect all float, defloat and copy and paste paper 2 as a new layer. Invert, hit the delete key and deselect. Delete the original layer and add your drop shadow.
Repeat this with circle 3 using paper 4. Move it around so you have stars in the page as you like before hitting that delete key. Don't forget your drop shadow!
Now that the template is finished copy and paste your tube onto your canvas. Resize it as needed and add a drop shadow after placing it where you would like it to be.
Now this is the spot that will make your graphic different than mine if you are using the same kit and tubes. Copy and paste some of your embellishments around the graphic in the way you like. Don't forget drop shadows!
Now for the fun part
 Add a new raster layer and move it to the bottom. Since this is animated you have to have a background. You can flood fill it with a color of your choosing. I chose black for this one.
You may want to add your copyrights at this time. This way it's done and out of the way but remember when you do them we will be resizing this graphic so make them a little larger so they are able to be read when we resize.
Ok, I want you to put your name on your tag where you want it and in position you like it and then copy and paste only that layer into animation shop.
Delete that layer in paint shop before we forget. We will be placing everything in animation shop so you can merge all flatten, save the graphic and close out paint shop if you wish.
Now when you post that name it should be in the exact position it was in psp which is what you want.
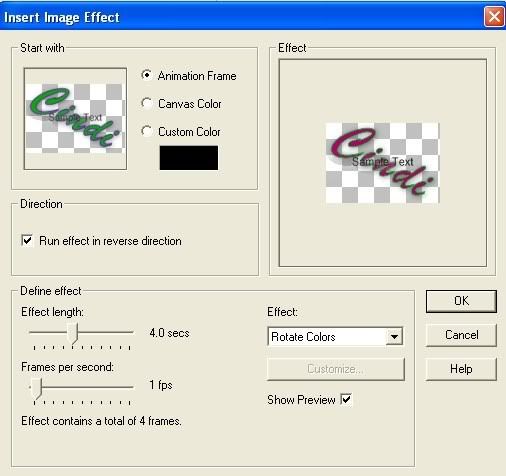
Go to insert image effect and choose rotate colors.
Use my settings and hit ok.
Now you should have 5 frames (unless you used your own setting which is fine)
Open your graphic you made in psp in animation shop.
On your name graphic click on the first frame and hit ctrl-a to select all frames.
Then hit ctrl-c to copy those selected frames.
On your graphic itself you will want to make more frames. You will need the same amount so I made 4 more frames using the duplicate button (white button that has 3 pages).
Now click on the first frame of your graphic. Hit ctrl-a to select all the frames and then ctrl-e to paste.
Click where you want your name to go and after you click there with your mouse they should all go in like it looked on your graphic in paint shop.
Now, if you preview it things will be a tad jumpy. let's fix that shall we?
Click on your first frame and choose frame properties. Change the number there too 100.
Click on the second frame and then hit ctrl. Click on the other frames to choose them but your first frame is finished so make sure that one isn't selected and go to frame properties and put 50 in there.
Remember the slower it goes the smoother the color changes. Mine jumps a little bit because of the border. It's not really jumping it's the color changing.
Now on the first frame hit crl-a again and right click on the top bar and pick animation properties. You don't want transparent. Some monitors don't show colors like others so it may look grey if your background is white. Choose opaque and the color of your background.
Now resize your graphic by going to Animation, resize animation and i made my longest side 450 so I can use it on forums and things.
Save this and you are done!